
Follow the steps in the article below to clean the feeder on an Ultimaker 2+, 3 or 3 Extended printer. If you are trying to clean the feeder on an original Ultimaker 2 printer (black and white feeder) see How do I clean the feeders on an Ultimaker 2 / 2 Extended printer? [LINK] If you are trying to unclog the nozzle see How do I fix a printer with a clogged nozzle [LINK].
Cleaning Feeders/Extruders on an Ultimaker 2+, 3, or 3 Extended printer (white colored feeder)
Estimated Time: 20 Minutes—1 Hour (quicker with practice) Difficulty: Easy
Tools Needed
- 2.0mm Allen Wrench
- Compressed Air
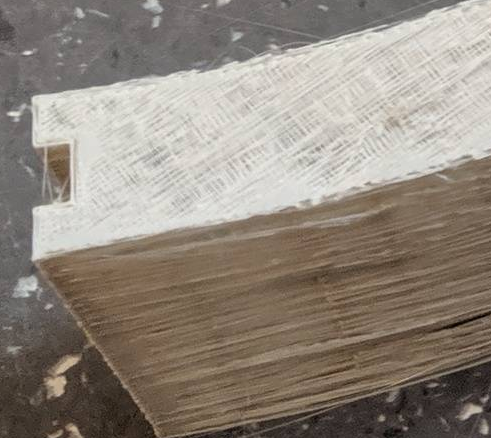
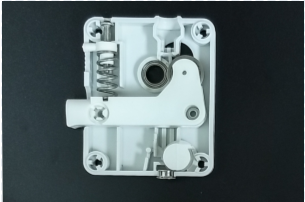
Occasionally you will notice brittle or stringy extrusion that is not fixed even by replacing the nozzle or printcore. Resulting prints may appear stringy or sponge-like and tend to be very fragile. An example of such a print is pictured below.The most likely culprit in this situation is either a clogged feeder or a clogged nozzle. In the process of feeding filament through the system small dust-like particles of filament will build up inside the feeder. Additionally, when changing materials it is not uncommon for a longer wispy bit of filament to break off inside the feeder. Eventually all this debris can make it difficult for the printer to advance filament. Cleaning the feeder is not difficult, but reassembling it can be awkward.
1) Preparation
- Unload any material from the machine
- Turn the printer off and then unplug the power connector.
2) Cleaning the Feeder
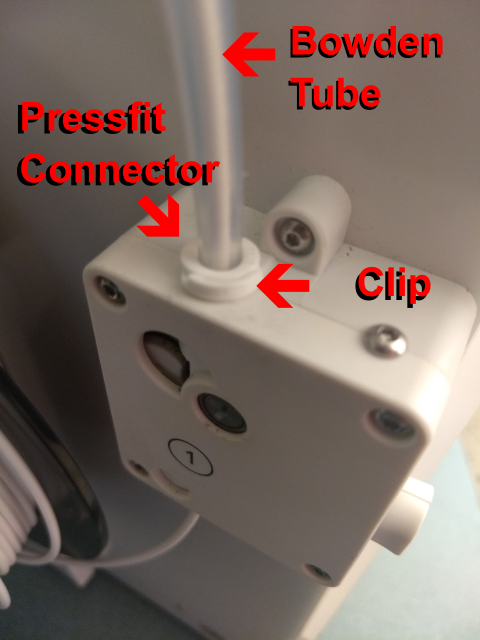
- Remove the bowden tube
- Remove the retaining clip from the bowden coupler
- Press down on the press fit connector
- Gently remove the bowden tube from the coupler.
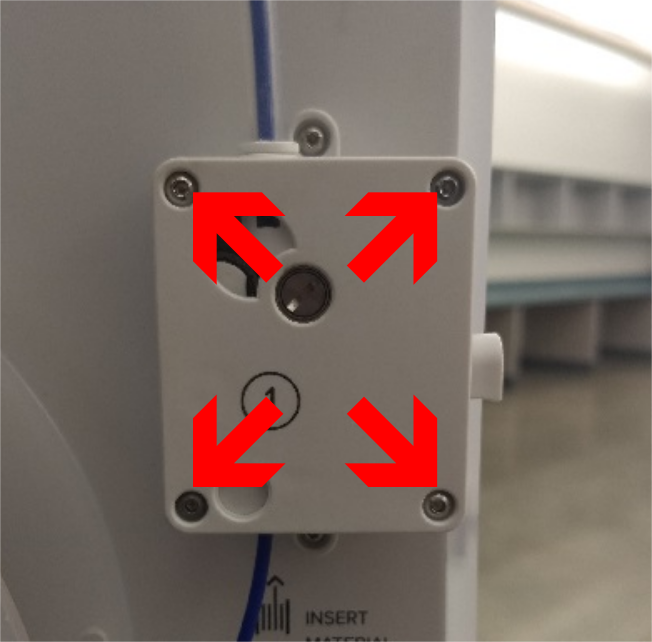
- Remove 3 of the 4 screws on the back of the feeder. Note - Make sure to hold your hand under the feeder as you remove the 4th screw as there are several parts that will try to fall when you remove the 4th screw especially the small metal bushing at the bottom of the feeder that filament is inserted into.
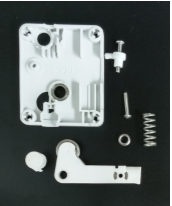
- Over a desk or cleared table remove the lid of the feeder. Note - there are spring loaded parts inside that may come out with some force when you do this. Be prepared to keep all the parts together!
- Clear out any debris that may be hanging out of the end of the Bowden tube.
- Blow out any debris that has collected inside the feeder with compressed air, especially in the white nylon spur gear and the brass knurled wheel. If the end of the Bowden tube seems excessively worn, replace it (see How Do I Replace the Bowden Tube? [LINK])
3) Reassembly
- Replace the parts in the feeder lid in their original configuration Note - The arm tension adjustment screw should be fully inside the feeder. Do not put the head of the screw outside the case.
- Replace the feeder on the printer fastening the four screws. Note - It will likely be easier to prevent the parts from falling out if you mate the bottom edge of the feeder lid to the feeder and then tilt the top of the lid up until you can fasten the screws.
4) Testing & Adjustment
- Adjust the idler arm tension by adjusting the tension screw with a 2.0mm allen wrench until the tension indicator is on the first mark.
- You may now want to print a bed leveling test just to make sure you have reassembled the feeder correctly. Note - If you find the feeder is feeding the filament backwards (Pulling the filament out instead of pushing it in, etc.) disassemble the feeder and turn it around so the large lever is facing out from the printer.
Comments
0 comments
Please sign in to leave a comment.