
Clearing Nozzle Clogs
Estimated Time: 15-45 minutes Difficulty: Easy
Materials Needed
- 2 feet of PLA filament (Preferably natural/clear color or highly contrasting to previous filament color)
Tools Needed
- Pliers
- Gloves
- Easy-Cutter or Wire Cutters
1) Why does the printer clog?
| Occasionally the nozzle of your 3d printer will become clogged. Sometimes you will have a partial clog that will result in stringy inconsistent extrusion, and sometimes you will have a full clog and no filament will be extruded. It is also possible to have an intermittent clog where filament will sometimes extrude and then stop after some time. Clogs are almost always caused by a bit of filament has burnt and created a small hard chunk of carbon that is too large to pass through the nozzle or that is stuck to the inside walls of the nozzle decreasing or blocking filament flow. If demand for the printer is immediate and you have a spare printcore on hand, you may want to change the printcore (see Cleaning Printcore Contacts) and clear your nozzle later. |  |
2) Pressure
It is possible to clear a nozzle clog in 3 ways. The first thing to try is to just apply a bit of pressure on the filament feeding into the feeder. Occasionally you will have a partial clog that is slight enough that the extra pressure on the filament will be enough to break it loose from the inside of the nozzle and if you’re lucky pass through and into the print.
3) Hot Pull
|
The second method for clearing a clog is “hot pulls.”
|
|
|
3.) Cold Pull
If hot pulls do not remove the clog, move on to cold pulls.
- If you are troubleshooting an Ultimaker 3 go to System->Maintenance->Printcore Cleaning, the printer will guide you through the cleaning process. Then skip to step 3.
- If you are troubleshooting an Ultimaker 2 go to Maintenance->Advanced->Heatup Nozzle.
- Set the temperature to 190C.
- While you are waiting, cut the tip of your piece of filament to a 45 degree angle with a pair of easy-cutters or wire cutters.
- When the printer has reached 190C, feed the filament through the printcore and into the nozzle.
- With a pair of pliers continue to apply pressure on the filament.
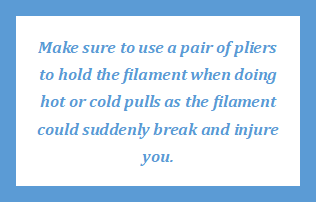
- With your other hand use the menu wheel to adjust the temperature to 90C.
- Continue applying pressure until the nozzle reaches 90C and continue applying pressure for 15 seconds to allow time for the temperature to stabilize.
- With one hand holding the printer down on the table, pull the filament out with a swift, firm pull.
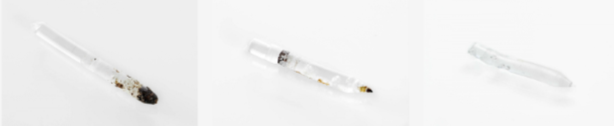
- Check the shape and color of the tip of your filament. It should be cone-shaped and clean as in the example below. If not, repeat the hot pull process until it is.
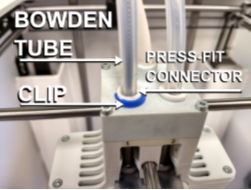
4.) Reassembly
When you have resolved the clog,
- Reinsert the Bowden tube into the press fit connector
- Secure the press fit connector with the clip.
- Load filament back into the machine
- Check that the clog has been resolved by printing one of the leveling check files attached below note - make sure to use the file that matches your printer UM2 for Ultimaker 2, 2+, &2 Extended or UM3 for Ultimaker 3 & 3 Extended
Comments
0 comments
Please sign in to leave a comment.