
Follow the steps in this article to replace the Bowden tube on your printer. A worn Bowden tube can result in weak or failed prints. Ultimaker recommends replacing the tube yearly.
Replacing Bowden Tubes
Estimated Time: 5-15 minutes Difficulty: Extremely Easy
Materials Needed
- Replacement Ultimaker Bowden Tube
Replacing a Bowden tube is extremely easy.
1.) Unload the machine
- First, Unload any material that may be in the machine.
- For instructions on unloading the filament on an Ultimaker 2, Ultimaker 2+, or Ultimaker 2 Extended you may like to read How do I Unload Filament from an Ultimaker 2 printer? [LINK] (opens in new tab)
- For instructions on unloading the filament on an Ultimaker 3 or Ultimaker 3 Extended you may like to read How do I Unload Filament from an Ultimaker 3 printer? [LINK] (opens in new tab)
- After unloading the filament wait 5 minutes for the printhead to cool.
- After the printhead has cooled, turn the machine off.
2.) Swap Bowden Tubes
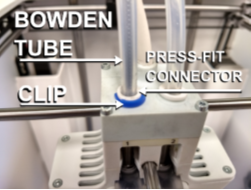
- Remove the Bowden retaining clip from the print head and the feeder. NOTE - It’s suggested to store them in a screw tray or similar as they are easy to loose.
- Next, push down on the press fit connector and pull the tube out.
- Repeat on both end and remove the tube. NOTE - If the press fit connector has broken tabs you will want to replace the connector as well. Bowden replacement kits from FBRC8 come with both the tube and new connectors.
- Insert the tube gently into the connector, lift the connector up and replace the clip. NOTE - One end of the bowden tube will be filleted to help guide the filament into the tube where it enters at the feeder. You will get the best results if you install the filleted end on the feeder and the flat end on the printhead.
- Repeat on the other end.
Comments
0 comments
Please sign in to leave a comment.