
Leveling the Buildplate on Ultimaker 2, 2+, & 2 Extended
Estimated Time: 10-60 minutes Difficulty:Varies (Easy-Difficult)
| Tools Needed |
| Ultimaker Calibration Card |
| Materials Needed |
| 3D Printing Filament Paper Towels |
Follow the steps in this article to level the build plate of an Ultimaker 2, 2+, or 2 Extended 3D printer. If you are trying to level the buildplate on an Ultimaker 3 or Ultimaker 3 Extended printer, you may want to see How do I level the buildplate on an Ultimaker 3, or 3 Extended?[LINK]
If the blue masking tape on your build plate needs to be replaced, do that before leveling the build plate. You may want to read How do I Resurface the Buildplate [LINK]
1) Do you need to level?
Making sure your buildplate is parallel to your X and Y axes is one of the most important things in getting a good print. If you're setting up a new 3D printer, setting up a printer that's been stored for some time, or setting up a printer that you just moved, you most likely will need to level the buildplate. Also, over time the buildplate will get out of level through the course of normal use of the printer. A good way to test if you need to level your printer is to try the leveling test linked at the bottom of this article. NOTE - make sure to select the file that matches your printer (UM2 for Ultimaker 2, 2+, & 2 Extended and UM3 for Ultimaker 3 & 3 Extended.)
Your test print should come out like the print below. The filament should stick consistently to the print surface. The print should be raised from the bed and not driven down into it where the printed filament becomes translucent.
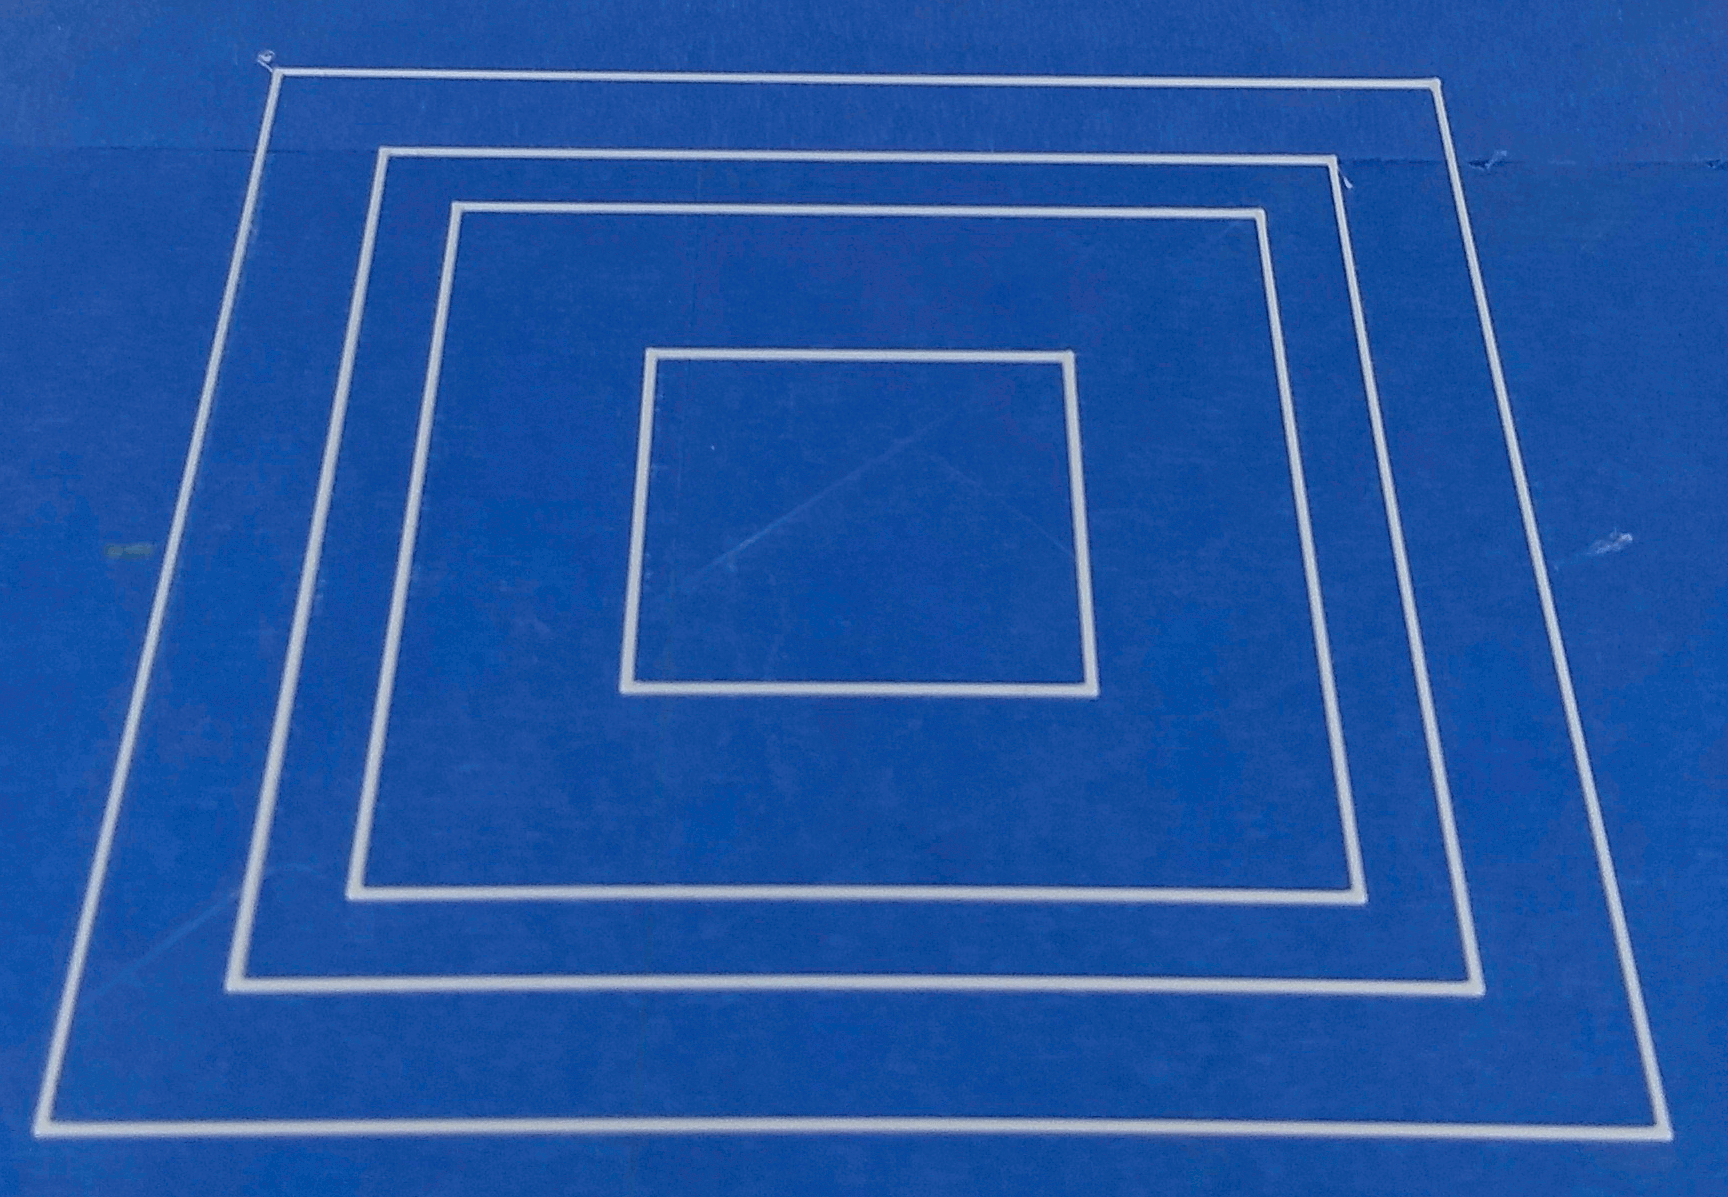
If part of your print is missing or did not stick to the buildplate, you will need to level your buildplate.
2) Prepare the Printer
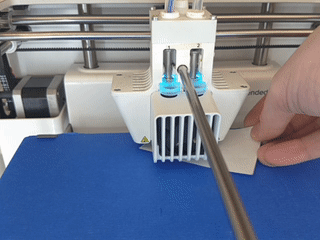
It will not be possible to level the buildplate properly if there is any filament stuck to the tip of the nozzle. Follow these steps to clean the end of the nozzle, then proceed with leveling.
- Heatup the nozzle of your printer
- Turn the printer on with the power switch on the rear left of the printer
- Turn the menu wheel to select Maintenance and push the wheel to select it
- Select Advanced and then Heat-up Nozzle
- Turn the wheel to 200C
- Wait for the nozzle to heat-up. When the nozzle has reached temperature, use the paper towel to carefully wipe away any filament from the end of the nozzle. Note - be careful. The nozzle is twice as hot as boiling water and can burn bare skin easily.
- Turn the wheel back to 0C.
- You may have to wipe the nozzle additional times as filament may ooze as the nozzle cools.
- Make sure your buildplate is ready. If it needs to be resurfaced, you may want to read How do I resurface the Buildplate [LINK] before continuing here.
3) Leveling the buildplate
- Use the menu wheel to select Maintenance and push the wheel to select it
- Select Buildplate the leveling wizard will begin.
- Select Continue on the first screen of the wizard
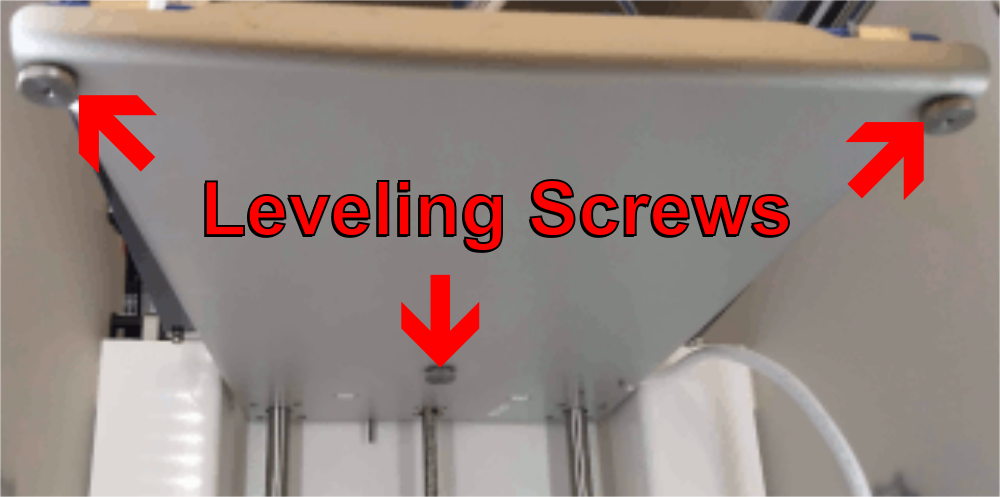
- If this is a new printer or if the buildplate is grossly out of adjustment, tighten all 3 leveling screws completely and then back off about 8 half-turns each.
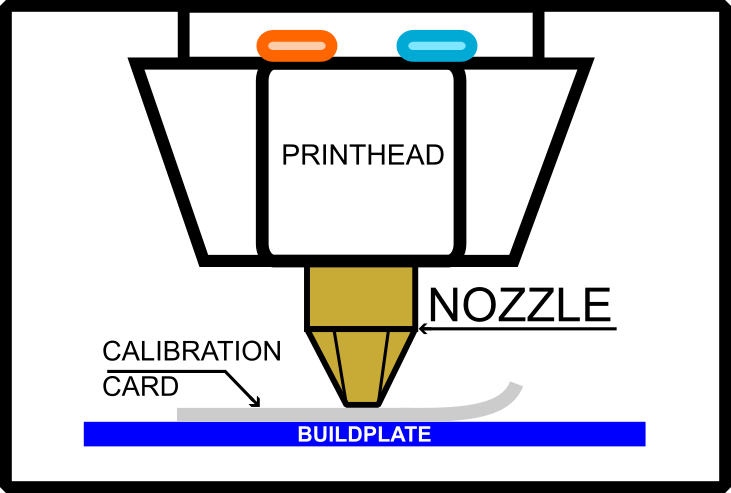
- Rotate the menu wheel until the buildplate is ABOUT 1mm or 1/16" from the tip of the nozzle. It is not at all critical to be at EXACTLY that distance. Use your judgement.
- Select Continue
- The printhead will move above the front left leveling screw. Adjust the SCREW (not the menu wheel!) until the buildplate is about 1mm from the nozzle
- Select Continue
- The printhead will move to the front right leveling screw. Again, adjust the SCREW (not the menu wheel) until the buildplate is about 1mm from the nozzle
- Select Continue
- Hold the calibration card between the nozzle and the buildplate and slowly wave it back and forth as you adjust the screw - until you feel a slight resistance between the card and the nozzle. Knowing how much resistance is enough is a big part of learning to level a printer efficiently. NOTE - make sure to not place any pressure on the buildplate with your hand while checking with the calibration card as this will effect your leveling. Also, be sure to remove your hand from the leveling screw while testing the resistance on the card as your hand will also push upwards somewhat on the buildplate and effect your leveling.
- Select Continue
- The printhead will move back to the back center. Adjust the screw until you feel a slight resistance between the card and the nozzle.
- Select Continue
- The printhead will move above the front left leveling screw. Adjust the screw until you feel a slight resistance between the card and the nozzle.
- Select Continue
- The printhead will move to the front right leveling screw. Adjust the screw until you feel a slight resistance between the card and the nozzle.
- Select Continue
- The leveling wizard will end.
4) Fine-tuning
Each time you adjust a leveling screw it also affects the leveling on the other 2 points. Repeat the leveling procedure again, but with the calibration card instead of to the 1mm height.
- Use the menu wheel to select Maintenance and push the wheel to select it
- Select Buildplate the leveling wizard will begin.
- Select Continue on the first screen of the wizard
- Use the calibration card, adjusting the back screw until there is slight resistance (ignore the message about 1mm)
- Select Continue
- Repeat this process all the way around.
5) Test!
Now that you've leveled the bed, print a test print as you did above in the section Do you need to level? If the print comes out good then you have leveled the print bed. If it has problems, continue fine-tuning. Also, consider wiping down the buildplate with a paper towel and 90% or better isopropyl rubbing alcohol (IPA) as that will clean off any oils that may be preventing your print from sticking.
Comments
0 comments
Please sign in to leave a comment.